Android Custom Side Menu 2-Navigation Drawer Alternative -> using Fragment

Hi there, I'm hasan who is passionate about tech. I Write about stuff I love, learn and the problems I solve.
Imagine we need to create a side menu in android. One of the options we have is to use Navigation Drawer. If you don't know about the navigation drawer it is better to check my first article Navigation Drawer to have a better and clear understanding, although it is not necessary.
What we will do in this article? Creating navigation drawer alternative using a fragment. Yes, you read it right.
Prequisites
- basic kotlin knowledge
- recyclerview/adapter
- interface
- fragment basics
- lambda functions
- ViewBinding
I have explained the navigation drawer and lambda basics in the first article. Read it here.
Steps to Implement Side Menu in Android Using Fragment
Create Android Studio Project
To create an android project, open Android Studio, click on New Project, select an empty activity, click Next, then give a name to your project and choose kotlin as the language, then click on Finish. Now, the new project is created let's move to the next step.
Recyclerview layout
Now let's create recyclerview layout file for our adapter. Click to res folder to expand it, right-click to layout-> new -> Layout resource File and name it as menu_list_item and choose the root element as Constraint Layout then click ok.
menu_list_item includes the following code
<?xml version="1.0" encoding="utf-8"?>
<androidx.constraintlayout.widget.ConstraintLayout xmlns:android="http://schemas.android.com/apk/res/android"
 xmlns:app="http://schemas.android.com/apk/res-auto"
 android:layout_width="match_parent"
 android:layout_height="wrap_content">

 <TextView
     android:id="@+id/textView"
     android:layout_width="wrap_content"
     android:layout_height="wrap_content"
     android:layout_marginTop="10dp"
     android:padding="8dp"
     android:text="TextView"
     android:textAlignment="center"
     android:textAllCaps="true"
     android:textColor="@color/black"
     android:textSize="20sp"
     android:textStyle="bold"
     app:layout_constraintEnd_toEndOf="parent"
     app:layout_constraintStart_toStartOf="parent"
     app:layout_constraintTop_toTopOf="parent" />
</androidx.constraintlayout.widget.ConstraintLayout>
Creating Recyclerview Adapter
Right-click to package name and create a new kotlin/file class and name it MenuAdapter
MenuAdapter.kt just regular recyclerview adapter with on click listener attached to textview. One difference is I am using the adapter function to submit data instead of sending the data with the constructor.
MenuAdapter.kt
package com.cobanogluhasan.androidcustomsidemenu

import android.view.LayoutInflater
import android.view.View
import android.view.ViewGroup
import androidx.recyclerview.widget.RecyclerView
import com.cobanogluhasan.androidcustomsidemenu.databinding.MenuListItemBinding

class MenuAdapter(private val listener: OnOptionClick) :
    RecyclerView.Adapter<MenuAdapter.ViewHolder>() {

    private val TAG = "MenuAdapter"
    private var optionList = emptyList<String>()

    override fun onCreateViewHolder(parent: ViewGroup, viewType: Int): ViewHolder {
        //inflate the layout file with viewbinding
        return ViewHolder(
            MenuListItemBinding.inflate(
                LayoutInflater.from(parent.context),
                parent,
                false
            )
        )
    }

    override fun onBindViewHolder(holder: ViewHolder, position: Int) {
        //bind the data to the view by calling bind function and pass the option string
        holder.bind(optionList[position])
    }

    override fun getItemCount(): Int = optionList.size

    inner class ViewHolder(private val binding: MenuListItemBinding) :
        RecyclerView.ViewHolder(binding.root), View.OnClickListener {
        fun bind(option: String) {
            // bind the data -> to textview in that case
            binding.textView.text = option
        }

        init {
            binding.textView.setOnClickListener(this)
        }

        override fun onClick(v: View?) {
            val position = adapterPosition
            val option = optionList[position]
            listener.onOptionClick(position, option)
        }
    }

    //send the data list to adapter from the fragment/activity by calling adapter.submitData()
    fun submitData(list: List<String>) {
        optionList = list
    }

    interface OnOptionClick {
        fun onOptionClick(position: Int, option: String)
    }
}
4- Creating A Fragment
We will be hosting our recyclerview inside the fragment and implement the interface we created to understand and manage which option is clicked. Right-click to package name and create a new Fragment. I named it as MenuFragment.
Let's create string resources for our options to avoid using not use hard-coded strings. I added 5 items for our side menu in the strings.xml file. We are going to use this list in our fragment to populate the recyclerview. Also, add string for our toggle button.
strings.xml
<resources>
    <string name="app_name">Android Custom Side Menu</string>
    <!-- TODO: Remove or change this placeholder text -->
    <string name="hello_blank_fragment">Hello blank fragment</string>
    <string name="option_1">Option 1</string>
    <string name="option_2">Option 2</string>
    <string name="option_3">Option 3</string>
    <string name="option_4">Option 4</string>
    <string name="option_5">Option 5</string>
    <string name="toggle">Toggle</string>
</resources>
Strings are ready and our fragment is created. Time to add a recyclerview into our (fragment XML). Simply add a recyclerview and constraints as match _parent. Do not forget to give it an id.
my fragment_menu.xml
<?xml version="1.0" encoding="utf-8"?>
<androidx.constraintlayout.widget.ConstraintLayout xmlns:android="http://schemas.android.com/apk/res/android"
    xmlns:tools="http://schemas.android.com/tools"
    android:layout_width="match_parent"
    android:layout_height="match_parent"
    tools:context=".MenuFragment">

    <androidx.recyclerview.widget.RecyclerView
        android:id="@+id/optionMenu"
        android:layout_width="match_parent"
        android:layout_height="match_parent" />
</androidx.constraintlayout.widget.ConstraintLayout>
Let's code our fragment class. Implement the OnOptionClick interface ve created and initialize the recyclerview. Simply add this code.
MenuFragment.kt
package com.cobanogluhasan.androidcustomsidemenu

import android.os.Bundle
import android.util.Log
import androidx.fragment.app.Fragment
import android.view.LayoutInflater
import android.view.View
import android.view.ViewGroup
import android.widget.Toast
import androidx.recyclerview.widget.LinearLayoutManager
import com.cobanogluhasan.androidcustomsidemenu.databinding.FragmentMenuBinding

class MenuFragment : Fragment(), MenuAdapter.OnOptionClick {

    private lateinit var binding: FragmentMenuBinding
    private lateinit var menuAdapter: MenuAdapter

    override fun onCreateView(
        inflater: LayoutInflater, container: ViewGroup?,
        savedInstanceState: Bundle?
    ): View {
        binding = FragmentMenuBinding.inflate(layoutInflater)
        return binding.root
    }

    override fun onViewCreated(view: View, savedInstanceState: Bundle?) {
        super.onViewCreated(view, savedInstanceState)
        //initialize recyclerview
        initRecycler()
    }

    private fun initRecycler() {
        Log.i("staryed", "initRecycler: ")
        //get the strings and add to list
        val list = mutableListOf<String>()
        list.add(getString(R.string.option_1))
        list.add(getString(R.string.option_2))
        list.add(getString(R.string.option_3))
        list.add(getString(R.string.option_4))
        list.add(getString(R.string.option_5))

        binding.optionMenu.apply {
            //create new adapter instance and apply it to our recyclerview.
            menuAdapter = MenuAdapter(this@MenuFragment)
            val manager = LinearLayoutManager(requireContext(), LinearLayoutManager.VERTICAL, false)
            layoutManager = manager
            adapter = menuAdapter
        }
        //send our menu to the adapter.
        menuAdapter.submitData(list)
    }

    override fun onOptionClick(position: Int, option: String) {
        Toast.makeText(requireContext(), option, Toast.LENGTH_LONG).show()
    }
}
Now if we run the app we will see nothing happens since we do not show the fragment.
5- Show the Fragment
Time to show the fragment and see if it's working. Add FragmentContainerView for our menuFragment and button for handling show/hide logic as toggle button. Navigate to activity_main.xml and add 2 views.
activity_main.xml
<?xml version="1.0" encoding="utf-8"?>
<androidx.constraintlayout.widget.ConstraintLayout xmlns:android="http://schemas.android.com/apk/res/android"
    xmlns:app="http://schemas.android.com/apk/res-auto"
    xmlns:tools="http://schemas.android.com/tools"
    android:layout_width="match_parent"
    android:layout_height="match_parent"
    tools:context=".MainActivity">

    <Button
        android:id="@+id/toggleButton"
        android:layout_width="wrap_content"
        android:layout_height="wrap_content"
        android:layout_margin="100dp"
        android:background="@color/black"
        android:padding="6dp"
        android:text="@string/toggle"
        android:textAllCaps="false"
        android:textColor="@color/white"
        android:textSize="20sp"
        app:layout_constraintStart_toEndOf="@id/fragmentContainerView"
        app:layout_constraintTop_toTopOf="parent" />

    <androidx.fragment.app.FragmentContainerView
        android:id="@+id/fragmentContainerView"
        android:name="com.cobanogluhasan.androidcustomsidemenu.MenuFragment"
        android:layout_width="0dp"
        android:layout_height="match_parent"
        android:background="#ddd"
        app:layout_constraintStart_toStartOf="parent"
        app:layout_constraintWidth_percent="0.3" />
    <!--
    0.3 percentage of width means the gonna take 30% of the screen
    give it any background color you want, I picked up gray.
    -->
</androidx.constraintlayout.widget.ConstraintLayout>
Our fragment in place and click listener implemented let's go and run the app.
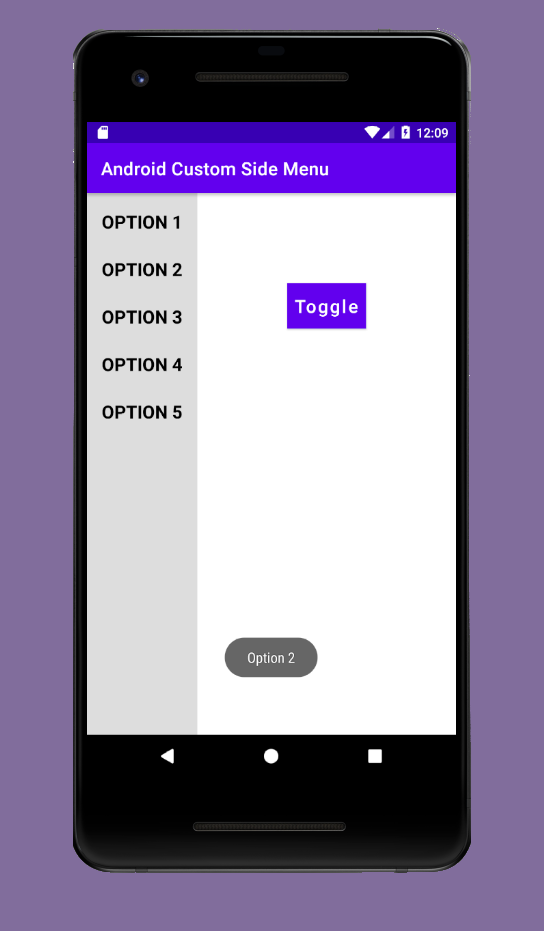
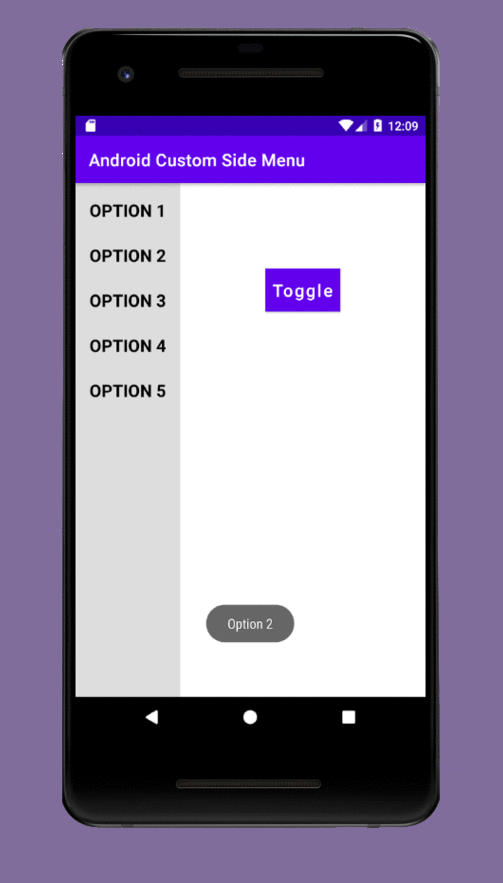
If everything is alright that is our app will look for now. Add the following line to hide the fragmentContainerView
android:visibility="invisible"
You can see the Toast message when an option is clicked. But there is no toggle functionality yet. This is what we are going to do in the next step.
6- Add Animations
Right-click to res folder-> new ->android resource directory, select anim and click okay to create anim folder for our animations. We will have 2 animations.
1- slide_in_left_to_right.xml
<set xmlns:android="http://schemas.android.com/apk/res/android"
    android:shareInterpolator="false">
    <translate
        android:duration="400"
        android:fromXDelta="-100%"
        android:fromYDelta="0%"
        android:toXDelta="0%"
        android:toYDelta="0%" />
</set>
2- slide_out_right_to_left.xml
<?xml version="1.0" encoding="utf-8"?>
<set xmlns:android="http://schemas.android.com/apk/res/android"
    android:shareInterpolator="false">
    <translate
        android:duration="400"
        android:fromXDelta="0%"
        android:fromYDelta="0%"
        android:toXDelta="-100%"
        android:toYDelta="0%" />
</set>
Everything is ready to move to the final step.
7-Toggle functionality
We're going to implement the toggle functionality on the main activity. Basically, show the menu if it is not showing and hide if it is showing(using animations).
Give an id to the constraint layout since we want the menu to be hidden whenever user click anywhere on the screen and also when an option is clicked. That is the latest version of the activity_main.xml
<?xml version="1.0" encoding="utf-8"?>
<androidx.constraintlayout.widget.ConstraintLayout xmlns:android="http://schemas.android.com/apk/res/android"
    xmlns:app="http://schemas.android.com/apk/res-auto"
    xmlns:tools="http://schemas.android.com/tools"
    android:id="@+id/container"
    android:layout_width="match_parent"
    android:layout_height="match_parent"
    tools:context=".MainActivity">

    <Button
        android:id="@+id/toggleButton"
        android:layout_width="wrap_content"
        android:layout_height="wrap_content"
        android:layout_margin="100dp"
        android:background="@color/black"
        android:padding="6dp"
        android:text="@string/toggle"
        android:textAllCaps="false"
        android:textColor="@color/white"
        android:textSize="20sp"
        app:layout_constraintStart_toEndOf="@id/fragmentContainerView"
        app:layout_constraintTop_toTopOf="parent" />

    <androidx.fragment.app.FragmentContainerView
        android:id="@+id/fragmentContainerView"
        android:name="com.cobanogluhasan.androidcustomsidemenu.MenuFragment"
        android:layout_width="0dp"
        android:layout_height="match_parent"
        android:background="#ddd"
        android:visibility="invisible"
        app:layout_constraintStart_toStartOf="parent"
        app:layout_constraintWidth_percent="0.3" />
    <!--
    0.3 percentage of width means the width of the view gonna take 30% of the screen,
    give it any background color you want, I picked up gray.
    -->
</androidx.constraintlayout.widget.ConstraintLayout>
To implement the toggle functionality navigate to MainActivity and add the following.
package com.cobanogluhasan.androidcustomsidemenu

import androidx.appcompat.app.AppCompatActivity
import android.os.Bundle
import android.view.View
import android.view.animation.AnimationUtils
import com.cobanogluhasan.androidcustomsidemenu.databinding.ActivityMainBinding

class MainActivity : AppCompatActivity() {

    private var isMenuShowing = false
    private lateinit var binding: ActivityMainBinding

    override fun onCreate(savedInstanceState: Bundle?) {
        super.onCreate(savedInstanceState)
        binding = ActivityMainBinding.inflate(layoutInflater)
        setContentView(binding.root)

        binding.toggleButton.setOnClickListener { toggleBtn() }
        //hide the menu on anywhere click
        binding.container.setOnClickListener { hideMenu() }
    }

    private fun toggleBtn() {
        if (!isMenuShowing) {
            //show the menu if is not showing
            binding.fragmentContainerView.visibility = View.VISIBLE
            //prepare and load animation
            val animation = AnimationUtils.loadAnimation(this, R.anim.slide_in_left_to_right)
            binding.fragmentContainerView.startAnimation(animation)
            // isMenuShowing = assign reverse of the current state.
            // if it's true it'll be false. if it's false, it will be true
            isMenuShowing = !isMenuShowing
        } else hideMenu()
    }

    //hideMenu should not be private otherwise we can not acces from the child fragment.
    fun hideMenu() {
        if (isMenuShowing) {
            //hide menu if it's showing
            binding.fragmentContainerView.visibility = View.INVISIBLE
            val animation = AnimationUtils.loadAnimation(this, R.anim.slide_out_right_to_left)
            binding.fragmentContainerView.startAnimation(animation)
            isMenuShowing = false
        }
    }
}
Our side menu is complete and working.
Feel free to clone, download or to play with the source code :)
Conclusion
In this tutorial, you learned how to create a navigation drawer alternative using fragment and recyclerview in Android from scratch. If you'd like to add the menu to the right you only need to change the constraint of the view(fragment) and add proper animations. I hope you enjoyed this. Thanks for reading, Like, comment and share and watch out for more articles from me. Happy Coding!!